

/image%2F0270648%2F201212%2Fob_d86b0ff124ea29d4b7389ceb15584669_overblog-logo.jpg)
I wanted my four lights and two ceiling fans to be controlled by one universal remote. After searching all over for an easy method, I came across one handy little electronic gadget which made the process both affordable and easy! It's an appropriate model of RF Remote Control Receiver and Transmitter from the various models available at carymart.com. In my case I needed a 6 button remote to separately turn on or off 2 ceiling fans and 4 lights. The Model I found was a 6-Channel 315 MHz RF Remote Control Transmitter and 110V AC Powered Receiver. The Transmitter and receiver are represented as:
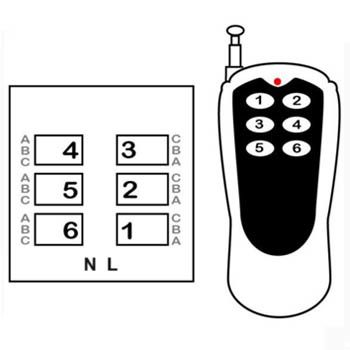
I installed the hardware for the fans and lights on my ceiling. I have 2 canister lights and 2 fans each with a light of their own. These are represented by the following symbols:

Then I decided how I wanted the buttons on the remote to correspond to the lights and fans in my room. I settled for this arrangement:

Now, we are ready to start wiring power to the relays in the receiver. Using 16G wire, and a small screwdriver, I began with the L line (BLACK WIRE).
*CAUTION* This will be the “HOT WIRE” which carries power to each fixture.
We will be using the NORMALLY OPEN circuit configuration, so connect the L line (BLACK WIRE) to the clamp labeled letter A on each relay switch. Wires should look like this:

Now we can continue to run the L line (BLACK WIRE) from each relay switch to individual fixtures, being careful to wire the correct relay number to the corresponding fixture. I have color coded each wire to help distinguish how the different fixtures are connected to specific relay numbers. The L line (BLACK WIRE) should leave the relay switch from the B clamp and run to each fixture.

Next we will complete our circuit by attaching our neutral wire, the N line (WHITE WIRE). The wires should “daisy chain” together and then a single line should return toward the receiver like the Yellow diagram shown here:

Finally, since the receiver is required for 110V AC power supply to communicate with the transmitter, we leave wire from the N clamp to Yellow line and wire from the L clamp to Red line.

The transmitter and receiver should come pre-programed to be in “TOGGLE MODE”. This means pressing each button turns each fixture on or off separately. Here, I have it wired so button 1 controls a fan. Button 2 controls the light on that fan. Buttons 3 and 4 control the individual canister lights. Button 6 controls the other fan, and button 5 controls that fan’s light. Test out the remote. If the receiver does not respond to the transmitter, refer to the instructions that come with the electronic switch. The relays can be easily taught to accomplish a variety of switch controls. I found this to be a simple and convenient way to control all the lighting and fan fixtures from one remote.


/http%3A%2F%2Fwww.creativeblindstoowoomba.com.au%2Fnew-site%2Fwp-content%2Fuploads%2FRoller-shutter-with-Red-stripes.jpg)
/image%2F0270648%2F20180523%2Fob_04d109_0012-roku-install-6c.jpg)
/https%3A%2F%2Fi.ytimg.com%2Fvi%2FtGld22Ls4dQ%2Fhqdefault.jpg)
/image%2F0270648%2F20180508%2Fob_815eff_garage-door-remote.jpg)
Comment on this post